Aug 28, 09:00 PM
/* 2023-04-26 */
https://www.sitepoint.com/community/t/best-way-to-use-if-else-in-a-promise-chain/414101/8
/* 2023-04-25 */
// https://stackoverflow.com/questions/24928846/get-return-value-from-settimeout
( (delay) => { return new Promise((resolve, reject) => {
setTimeout(() => {
resolve(Math.floor(Math.random() * 2) ); /* returns a zero or a one BETTER WAY SEE SITEPOINT FORUM */
}, delay);
});
})(1500)
.then( (done) => { return ( ‘==>>’ + done )
})
.then( (last) => console.log(last) )
;
/* 2023-01-12a – async.await chaining */
const asyncFunction = (timeIn) => {
return new Promise( (resolve, reject) => {
setTimeout(() => {
resolve(++timeIn);
}, timeIn * 1000);
});
}
(async (value) => {
console.log(‘starting with: ‘, value);
const firstResult = await asyncFunction(value);
const secondResult = await asyncFunction(firstResult);
console.log(‘ending with:’, secondResult);
})(1);
/* 2023-01-12 – async-await chaining */
async function asyncCounterFunction(counter) {
return ++counter;
}
(async (initialData) => {
const firstTime = await asyncCounterFunction(initialData);
const secondTime = await asyncCounterFunction(firstTime);
const thirdTime = await asyncCounterFunction(secondTime)
console.info(await asyncCounterFunction(thirdTime))
console.log(‘Completion!’);
})(1)
async function testFunction(initialData) {
const firstTime = await asyncCounterFunction(initialData);
const secondTime = await asyncCounterFunction(firstTime);
const thirdTime = await asyncCounterFunction(secondTime)
console.info(await asyncCounterFunction(thirdTime))
console.log(‘Completion!’);
}
testFunction(1);
async function asyncCounterFunction(counter) {
try {
return ++counter;
} catch(e) { console.error(e)
}
}
/* 2023-01-10 – added async-await instead */
const myFunction = async (seconds) => { await setTimeout( () => { console.info(seconds, “done!”); }, seconds) } ; myFunction(2000) ;
/* one liner */
( async (seconds) => { await setTimeout( () => { console.info(seconds, “done!”); }, seconds) } )(2000)
/* old ugly way */
async function newFunction(seconds) { await setTimeout( () => { console.info(seconds, “done!”); }, seconds) } ; newFunction(2000) ;
==================================================================================
<<< leave this on top, fast & crude way to flatten out a promise! >>>
(async () => { try { let result = await feathersApp.logout(); console.log(‘the result is: ‘ + result) } catch (e) { console.log(e); } } ) () ;
(async () => let logoutResult = await feathersApp.logout(); console.log(logoutResult); })().catch(e => { console.log(e) });
===========================================================================================
2022-03-25:
const firstPromise = (promiseInput) => {
return new Promise( (resolve, reject) => { // long version
console.log(promiseInput);
let returnStuff = promiseInput + ‘ – parameter passed into first promise. ‘ ;
setTimeout( () => {
console.log (‘waiting a half-second, resolving: ‘ + returnStuff);
resolve (returnStuff);
},500 );
// we could use the “reject” function if this promise failed!
})
}
// shorter version per “windbeneathmywings”
const secondPromise = (promiseInput) => new Promise( (resolve, reject) => {
console.log(promiseInput);
let returnStuff = promiseInput + ‘ – parameter passed into second promise. ‘ ;
setTimeout( () => {
console.log (‘waiting a half-second, resolving: ‘ + returnStuff);
resolve (returnStuff);
},500 );
})
const thirdPromise = (promiseInput) => new Promise( (resolve, reject) => {
console.log(promiseInput);
let returnStuff = promiseInput + ‘ – parameter passed into third promise. ‘ ;
setTimeout( () => {
console.log (‘waiting a half-second, resolving: ‘ + returnStuff);
resolve (returnStuff);
},500 );
})
firstPromise(‘one’)
.then( value => { return secondPromise (value + ‘ two’) }) // long version
.then( value => thirdPromise (value + ‘ three’) ) // shorter version per “windbeneathmywings”
.then( value => console.log(’ FINAL result: ‘ + value) )
.catch( error => { console.log(’ ERROR! ‘ + error ) })
;
=================================================================================
// ======================================================
// ** 2021-09-14 10:47 AM return promise(dot)then example **
const promiseA = (parm) => {
return new Promise( (resolve, reject) => {
setTimeout( () => {
resolve(“promise-A “ + parm);
}, 1000 );
});
}
const promiseB = (parm) => {
return new Promise( (resolve, reject) => {
setTimeout( () => {
resolve(“promise-B “ + parm);
}, 2000 );
});
}
const promiseC = (parm) => {
return new Promise( (resolve, reject) => {
setTimeout( () => {
resolve(“promise-C “ + parm);
}, 3000 );
});
}
function getExample(initialParms) {
/* notice Promise-dot-then-dot-catch usage, NOT async/await usage */
// locally scoped
const results = {};
return promiseA(initialParms)
.then ( (resultA) => {
// add value to results object
results.a = resultA;
// pass result of this promise to next promise
return promiseB(resultA);
}
)
.then ( (resultB) => {
results.b = resultB;
return promiseC(resultB);
}
)
.then ( (resultC) => {
results.c = resultC;
// results object now contains all values from promise chain
return Promise.resolve(results);
}
)
.catch ( (error) => {
return Promise.reject(error);
}
)
;
}
let marksResults ; getExample(‘first parms entered’).then( (finalResults) => { marksResults = finalResults } ) ;
// =======================================================
// ** 2021-09-13 3:00 PM async/await example **
const promiseA = (parm) => { return new Promise((resolve, reject) => { setTimeout(resolve, 0500, ‘promise A ‘ + parm); }) };
const promiseB = (parm) => { return new Promise((resolve, reject) => { setTimeout(resolve, 0500, ‘promise B ‘ + parm); }) };
async function getExample(parm) {
/* notice async/await usage, not Promise-dot-then-dot-catch usage */
let resultA = await promiseA(parm);
console.log(‘first: ‘ + resultA);
// some processing
let resultB = await promiseB( parm + ‘-’ + resultA );
console.log(‘second: ‘ + resultB);
// more processing
return resultB // something using both resultA and resultB
}
let final ; getExample(‘123’).then ( (xx) => { final = xx ; } )
// =====================================================
// ** 2021-09-13 10am Promises.all example where parameters are not passed **
https://developer.mozilla.org/en-US/docs/Web/JavaScript/Reference/Global_Objects/Promise
my own example of “Promises.all”:
const promise1 = new Promise((resolve, reject) => { setTimeout(resolve( ‘promise one’), 0500 ); }); // notice different way for parm!
const promise2 = new Promise((resolve, reject) => { setTimeout(resolve, 6000, ‘promise two’); });
const promise3 = new Promise((resolve, reject) => { setTimeout(resolve, 8000, ‘promise three’); });
Promise.all([promise1, promise2, promise3])
.then ((values) => { console.log(values); })
.finally((values) => { console.log(‘here!’); }) ;
// ================================================================================
Chained Promises:
const myPromise = new Promise((resolve, reject) => {
setTimeout(() => {
resolve(‘foo’);
}, 300);
});
myPromise
.then(value => { return value + ‘ and bar’; })
.then(value => { return value + ‘ and bar again’; })
.then(value => { return value + ‘ and again’; })
.then(value => { return value + ‘ and again’; })
.then(value => { console.log(‘value: ‘ + value) })
.catch(err => { console.log(err) });
https://www.mariokandut.com/how-to-wait-for-multiple-promises-in-node-javascript/
How to use Promise.all
const all = Promise.all([
new Promise((resolve, reject) =>
setTimeout(() => resolve(1), 1000),
),
new Promise((resolve, reject) =>
setTimeout(() => resolve(2), 2000),
),
new Promise((resolve, reject) =>
setTimeout(() => resolve(3), 3000),
),
]).catch(err => console.log(‘Promise was rejected!’, err));
all.then(results => console.log(results)); // the output is: [1, 2, 3]
https://stackoverflow.com/questions/28250680/how-do-i-access-previous-promise-results-in-a-then-chain
A less harsh spin on “Mutable contextual state”
function getExample(){
//locally scoped
const results = {};
return promiseA(paramsA).then(function(resultA){
results.a = resultA;
return promiseB(paramsB);
}).then(function(resultB){
results.b = resultB;
return promiseC(paramsC);
}).then(function(resultC){
//Resolve with composite of all promises
return Promise.resolve(results.a + results.b + resultC);
}).catch(function(error){
return Promise.reject(error);
});
}
— Mark Edwards
javascript,
Jul 16, 05:05 PM
2023-01-26 – you can “disable” the normal security by following these instructions:
https://stackoverflow.com/questions/20294381/google-server-putty-connect-disconnected-no-supported-authentication-methods-a
https://zaedify.com/how-to-connect-to-gcp-vm-using-putty/
0 – set password for username (‘mark’)
1 – Edit the /etc/ssh/sshd_config file.
2 – Change PasswordAuthentication and ChallengeResponseAuthentication to yes.
line 70: (change “PasswordAuthentication no” to “PasswordAuthentication yes”)
??????? ChallengeResponseAuthentication too ????
3- sudo systemctl restart sshd.service ;
NOTE:
sudo vi /etc/selinux/config; and changing SELINUX=permissive will permanently lock you out!
SELINUX=enforcing appears to be required.
POSSIBLE SALVAGE: http://blog.aristadba.com/2021/03/failed-to-load-selinux-policy-freezingsolved/#:~:text=In%20the%20boot%20menu%2C%20select,system%20and%20system%20will%20restart.
.
much of this needs to be revised…. 2022-12-12
1) click name of vm instance
2) scroll down to “Network Interface” and click “default”
3) click “FIREWALLS” tab (inbetween “.STATIC INTERNALS IP ADDRESSES” and “ROUTES”)
4) either click down-arrow by “vpc-firewall-rules” or just create a new rule
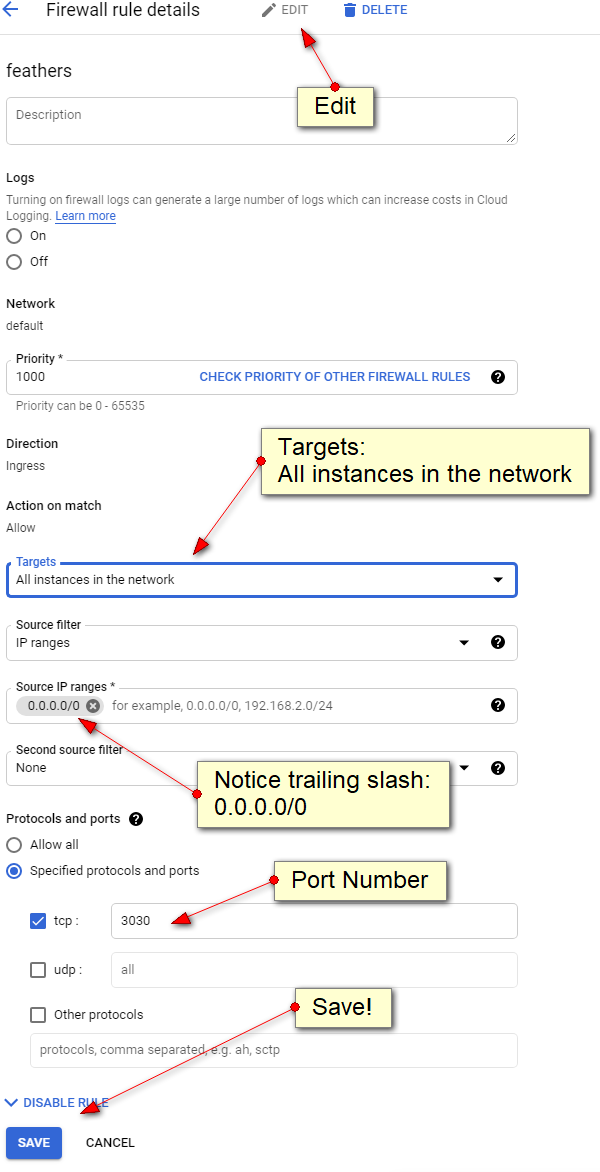
5a) be sure to select “Ingress:
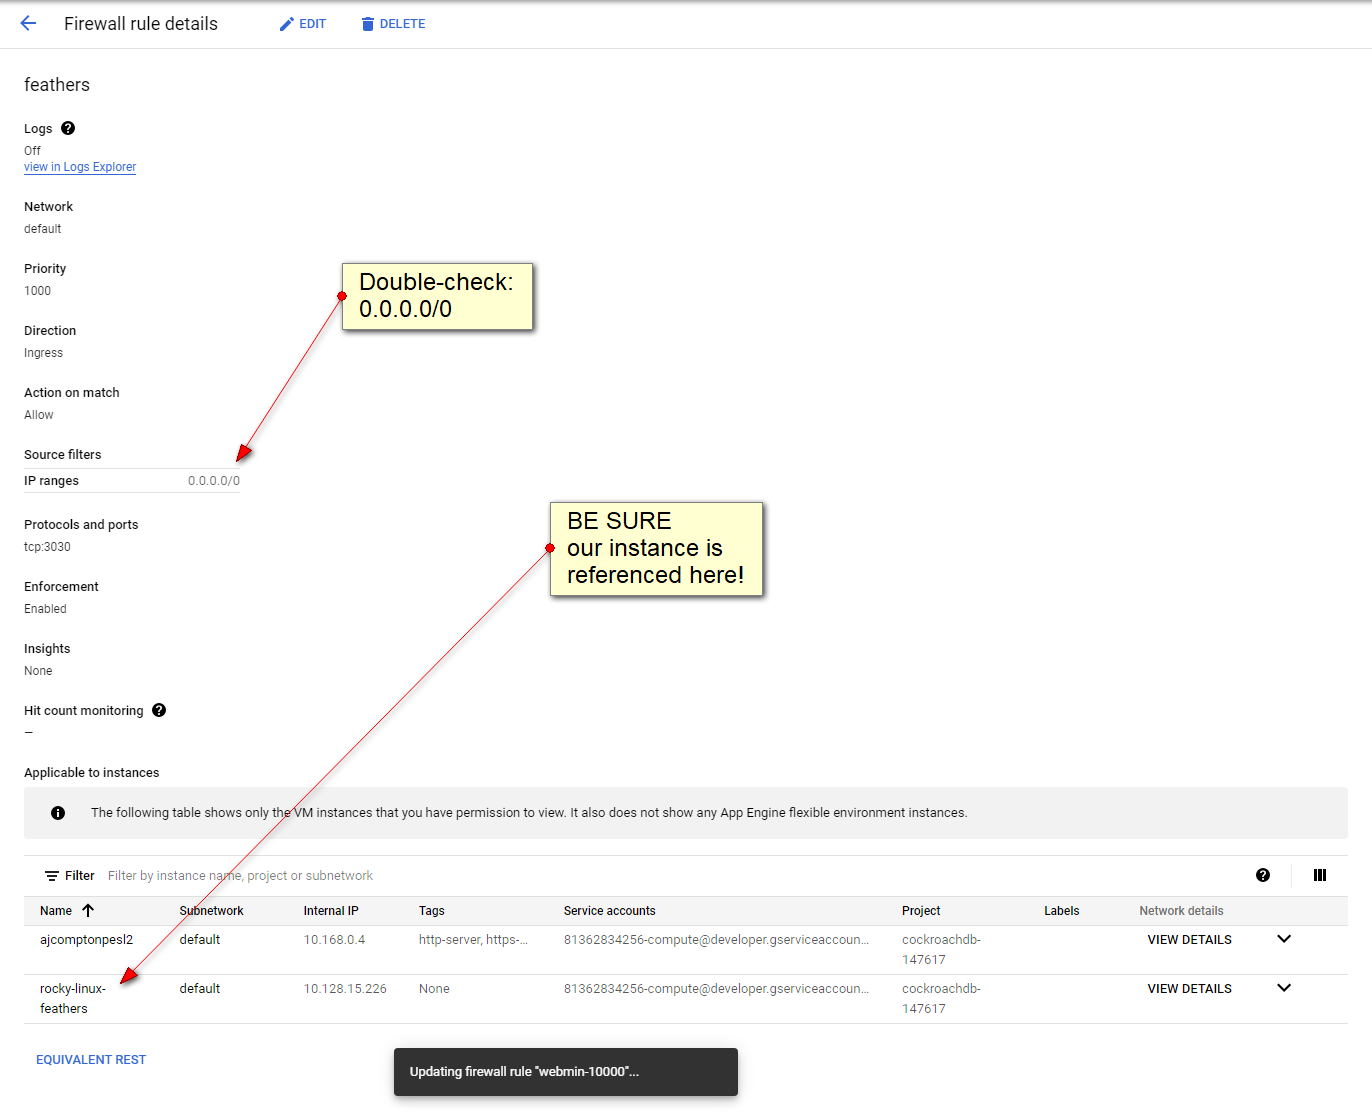
5b) be sure not to overlook the “0.0.0.0/0” setting for the “Source” and note trailing “/0” that must be included
UPDATE: or just include your own home IP number (webpage ssh login will no longer work)
6) UDP NOT REQUIRED some day, play with the ftp vs udp
7) naturally select which ports you want open!
IMPORTANT!
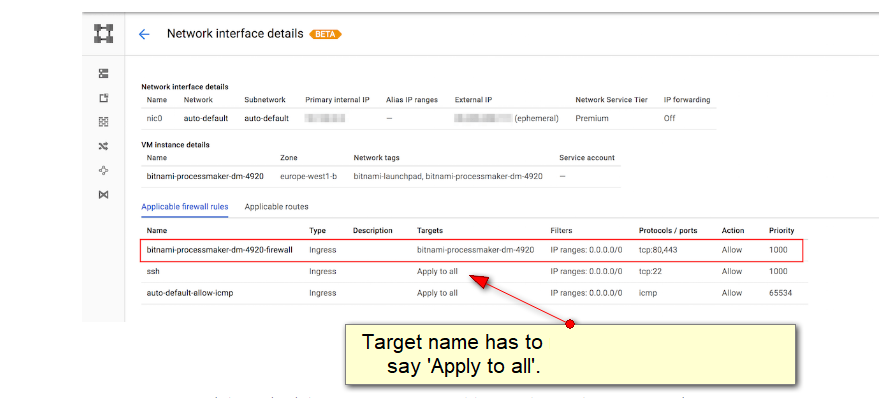
1 - set Target "Apply to All"
2 - source IP range: 0.0.0.0/0 (i always forget trailing slash-zero
3 - reboot  (?)
4 - mariadb MAY need to have:     (did this again 2023-05-18)
bind-address=0.0.0.0
skip-networking=0
in either /etc/my.cnf or  /etc/my.cnf.d/server.cnf
https://docs.bitnami.com/virtual-machine/infrastructure/lamp/administration/connect-remotely-mariadb/
UPDATE: target tag does not seem to work, but "Apply to all" does!
I have had great difficulty getting google-vm to open a port.
my big "struggle/mistake" was the name of the network "target" - it should be "Apply to all".
This value should either be "Apply to all" (or MAYBE specify the name of the google-vm??)
this article is very comprehensive
https://docs.bitnami.com/google/faq/administration/use-firewall/
it proves a little "tricky" to get to the network area:
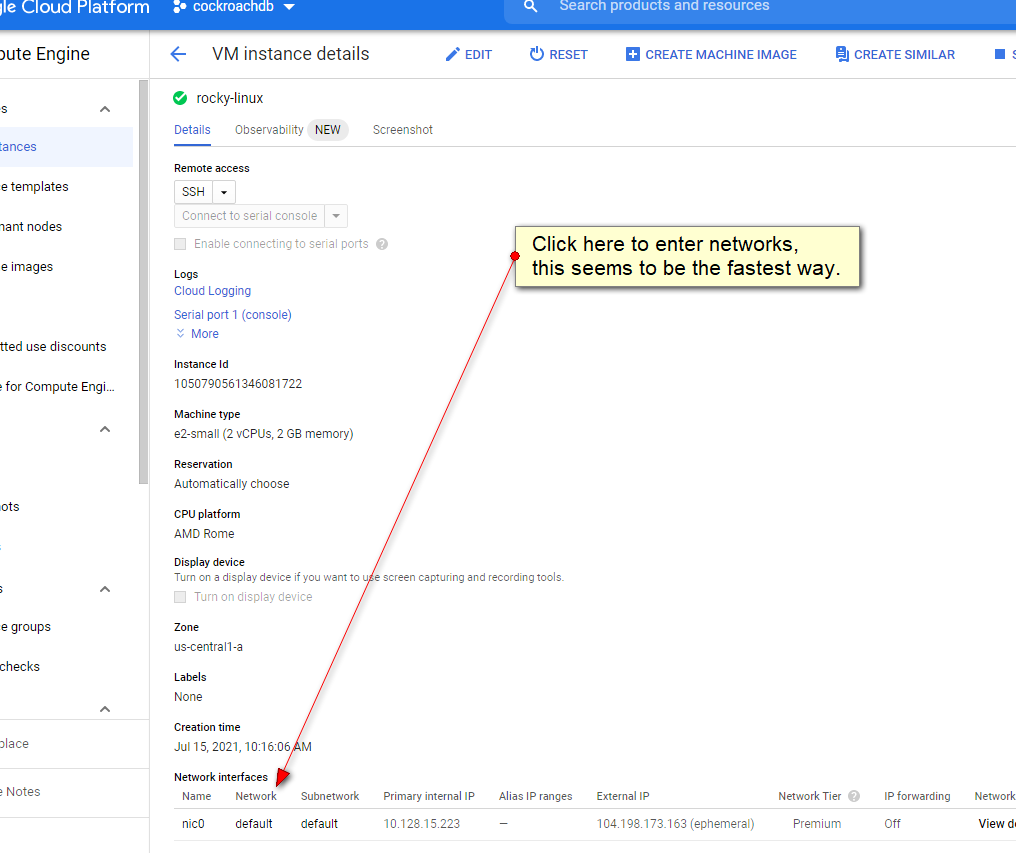
this is where it HAS to say "Apply to all": (i never did get the target-name working!)
EASY PORT TEST!
ON SERVER:
ls -l | ncat --listen 10000 ; ## this simple example will pass the results of the "ls" command out port 10000 then exit.
ON CLIENT:
telnet 10.128.15.223 10000; ## this client command should display the directory contents then exit.
ncat examples
To display open server ports:
netstat --listening  --numeric  --tcp  --udp;  ## displays open ports
netstat --listening  --numeric  --tcp  --udp;  ## displays open ports (deprecated)
EDIT: 2021-10-14
i forgot about the "target" and to set 0.0.0.0/0
— Mark Edwards
,
Jul 9, 06:24 AM
John Q:
That looks like lvm, which is a fine method. I’ve used lvm in the past, and don’t have any complaints on it except I prefer zfs over lvm.
dnf localinstall https://zfsonlinux.org/epel/zfs-release.el8_4.noarch.rpm ;
gpg —import —import-options show-only /etc/pki/rpm-gpg/RPM-GPG-KEY-zfsonlinux ;
dnf config-manager —disable zfs ;
dnf config-manager —enable zfs-kmod ;
dnf install zfs ;
zpool create test raidz sdb sdc sdd sde ;
untested, i am not sure using zfs is worth the trouble.
reference:
https://openzfs.github.io/openzfs-docs/Getting%20Started/RHEL%20and%20CentOS.html
https://linuxhint.com/install-zfs-centos7/
https://blog.eldernode.com/install-zfs-file-on-centos-8/
— Mark Edwards
,
Apr 5, 11:50 PM
Instructions to create a VirtualBox-VM on a Windows box and convert it into a Google-VM
prerequisites:
http://isoredirect.centos.org/centos/8/isos/x86_64/ (i choose centos-8)
https://www.virtualbox.org/wiki/Downloads
(may not be necessary) https://cloud.google.com/sdk/docs/downloads-interactive - GoogleCloudSDKInstaller.exe
http://gnuwin32.sourceforge.net/packages/gtar.htm
http://gnuwin32.sourceforge.net/packages/gzip.htm
1) create a virtualbox-vm install to be transferred to google-vm
creation:
-
EXACT gigabyte, like 10, 20 qcow(?) (copy on right)
settings:
- System, Motherboard, disable floppy (not sure if this is necessary)
- System, Processor, Enable PAE/NX (may be already enabled)
- Storage, “Empty”, click the little CD icon (right) and select your ISO file
attach ISO file to the virtual cd drive
- Audio, disable audio (not sure if this is necessary ?)
- network: ADVANCED — paravirtualized network (virtio-net)
2) start VirtualBox-vm (i had to verify my CD(optical) boot disk)
during install:
- Under “Software Selection” i choose “minimal functionality”
- Under Device Destination, i had to CLICK TWICE my ATA-VBOX-HARDDISK
- under NETWORK, click “CONFIGURE” button, “General” tab, and select “Connect automatically with priority”
- also under NETWORK, i like to make sure the network is working, there is an ON_OFF slider and you should be issued
an IP number which you can verify
- Centos-8 requires you to set the root password (dont forget it!)
- Click “Begin Installation” button
2) stop virtualbox-vm Power off the machine, do not select “reboot”
3) settings, Storage, remove ISO from virtual cd
4) boot up your new virtualbox-vm
(optional)
dnf —assumeyes install vsftpd; systemctl enable vsftpd; systemctl start vsftpd ;
systemctl stop firewalld ; ## or three below:
firewall-cmd —zone=public —permanent —add-port=21/tcp ;
firewall-cmd —zone=public —permanent —add-service=ftp ;
firewall-cmd —reload ;
5a) new /etc/default/grub file:
### W-O-R-K-I-N-G GRUB
### to compile:
### grub2-mkconfig —output=/boot/grub2/grub.cfg ;
GRUB_TIMEOUT=5
GRUB_DISTRIBUTOR=”$(sed ‘s, release .*$,,g’ /etc/system-release)”
GRUB_DEFAULT=saved
GRUB_DISABLE_SUBMENU=true
GRUB_TERMINAL_OUTPUT=“console”
##GRUB_CMDLINE_LINUX=“crashkernel=auto resume=/dev/mapper/cl-swap rd.lvm.lv=cl/root rd.lvm.lv=cl/swap rhgb quiet”
GRUB_CMDLINE_LINUX=“console=ttyS0,38400n8d crashkernel=auto resume=/dev/mapper/cl-swap rd.lvm.lv=cl/root rd.lvm.lv=cl/swap”
GRUB_DISABLE_RECOVERY=“true”
GRUB_ENABLE_BLSCFG=true
5b) chmod 644 /etc/default/grub;#### (just in case)
6) new new initramfs.bsh: (thank you Rich Halloway!)
echo ‘# Ensure Google Compute Engine drivers are built into initramfs’ >> /etc/dracut.conf.d/GCE.conf
echo -e “nadd_drivers+=” virtio_scsi virtio_blk virtio_net”“ >> /etc/dracut.conf.d/GCE.conf
echo ‘# Ensure AWS drivers are built into initramfs’ >> /etc/dracut.conf.d/AWS.conf
echo -e “nadd_drivers+=” xen-blkfront xen-netfront”“ >> /etc/dracut.conf.d/AWS.conf
echo ‘# Ensure AWS ENA drivers are built into initramfs’ >> /etc/dracut.conf.d/AWS-ENA.conf
echo -e “nadd_drivers+=” xen-blkfront xen-netfront nvme nvme-fabrics nvme-fc nvme-rdma nvme-fcloop nvme-loop nvmet-fc nvmet-rdma nvmet ena”“ >> /etc/dracut.conf.d/AWS-ENA.conf
kversion=$( rpm -q kernel | sed ‘s/kernel-//’ )
dracut -v -f “/boot/initramfs-${kversion}.img” “$kversion”
7) stop virtualbox-vm
8) use VirtualBox to convert vdi/qcow to a RAW file:
cd “Program Files“OracleVirtualBox
VboxManage.exe clonemedium disk “D:virtualboxcentos-8centos-8.vdi” “D:virtualboxcentos-8disk.raw” -format RAW
9) turn RAW file to a TAR (tape-archive) file: (notice file names in quotes, thank you Ric Alloway)
- cd to location of RAW file
- “C:Program Files (x86)GnuWin32bintar” —verbose —create —sparse —file=“disk.tar” “disk.raw”
10) turn TAR file to a gzip file:
“C:Program Files (x86)GnuWin32bingzip.exe” —verbose —stdout “disk.tar” > “disk.tar.gz”
11) upload your new disk.tar.gz file here:
https://console.cloud.google.com/storage/browser/
12) https://console.cloud.google.com/compute/instancesDetail/zones/us-central1-a/instances/ – cloud shell:
gcloud compute images create centos-project —project=marks-project —source-uri=https://storage.googleapis.com/centos-project/disk.tar.gz —storage-location=us
13) create a new vm from this newly created image.
14) i was unable to log in using the webbrowser SSH command, but was able to no problems using PuTTy
OLD STUFF BELOW ============
https://www.youtube.com/watch?v=YlcR6ZLebTM
1) create a VirtualBox-vm install to be transferred to google-vm – !! MINIMAL install l!
2) stop VirtualBox
3a) C:
3b) cd “Program Files“OracleVirtualBox
3c) VboxManage.exe clonemedium disk “D:virtualboxcentos-8-smallcentos-8-small.vdi” “D:virtualboxcentos-8-smalldisk.raw” -format RAW
3d) ignore “already exists” message…. maybe this is left over from before?
4) create NEW virtualbox install at least twice the size of the original
5) dnf -y install vsftpd; systemctl start vsftpd; systemctl stop firewalld; ## https://linuxhint.com/configure_ftp_server_centos8/
6) using filezilla, ftp the disk.raw created into step three into the NEW Virtualbox
7) tar —verbose —format=oldgnu -cSzf disk.tar.gz disk.raw ; ## notice NO dot-slash prefix on the disk.raw file!
8) sftp disk.tar.gz back to desktop
9) upload disk.tar.gz to:
https://console.cloud.google.com/storage/browser/centos-8-test;tab=objects?forceOnBucketsSortingFiltering=false&project=cockroachdb-147617&prefix=&forceOnObjectsSortingFiltering=false
10) gcloud compute images create centos-8-from-virtualbox-raw —project=cockroachdb-147617 —source-uri=https://storage.googleapis.com/centos-8-test/disk.tar.gz —storage-location=us ;
gcloud beta compute —project=cockroachdb-147617 instances create instance-1 —zone=us-central1-a —machine-type=e2-medium —subnet=default —network-tier=PREMIUM —maintenance-policy=MIGRATE —service-account=81362834256-compute@developer.gserviceaccount.com —scopes=https://www.googleapis.com/auth/devstorage.read_only,https://www.googleapis.com/auth/logging.write,https://www.googleapis.com/auth/monitoring.write,https://www.googleapis.com/auth/servicecontrol,https://www.googleapis.com/auth/service.management.readonly,https://www.googleapis.com/auth/trace.append —image=centos-8-from-virtualbox-raw —image-project=cockroachdb-147617 —boot-disk-size=16GB —boot-disk-type=pd-standard —boot-disk-device-name=instance-1 —reservation-affinity=any
OLD: VboxManage clonehd -format RAW ~/VirtualBox VMs/gce-demo/gce-demo.qcow ~/disk.raw
VboxManage clonemedium -format RAW ~/VirtualBox VMs/gce-demo/gce-demo.qcow ~/disk.raw
https://cloud.google.com/compute/docs/import/import-existing-image#virtualbox
cd into this directory:
C:
cd Program FilesOracleVirtualBox
VBoxManage.exe clonemedium disk “D:virtualboxcentos-8centos-8-a.vdi” “D:virtualboxcentos-8disk.raw” -format RAW
VBoxManage.exe clonemedium disk “D:virtualboxcentos-8centos-8-a.vdi” “D:virtualboxcentos-8disk.qcow” -format qcow
### qcow2 did NOT work….
#########7zip – create tar gzip file ( may need to create tar first than gzip [gz] file, or name format (dot)tar(dot)gz )
tar —verbose —format=oldgnu -cSzf gce-demo.tar.gz disk.raw ;
## create bucket here: https://console.cloud.google.com/storage/browser/
## copy the gzip file to the google cloud
gsutil cp centos-8.RAW.tar.gz gs://virtualbox-gce-demo-bucket-name/cent0s-8.RAW.tar.gz
gsutil cp centos-8-a.RAW.gz gs://centos-8-test/centos-8.RAW.gz
## OR
JUST CLICK-
DRAG…..
## create an image
gcloud compute images create gce-demo —source=uri gs://virtualbox-gce-demo/cent0s-8.RAW.tar.gz
gcloud compute instances create gce-demo —image gce-demo —machine-type=standard-1 —zone us-central1-b
## change format variable to format ‘fixed’ (
NOT PART OF
THE PROCESS)
VBoxManage.exe clonemedium disk “D:virtualboxcentos-8centos-8.vdi” “D:virtualboxcentos-8centos-8-a.vdi” -variant Fixed
## change format variable to format ‘fixed’ (
NOT PART OF
THE PROCESS)
— Mark Edwards
,
Jan 30, 10:51 PM
go to https://whatismyipaddress.com and get IP number example: 123.123.123.123
SELECT User, Host FROM mysql.user WHERE 1 AND Host != ‘localhost’ ;
## optionally REMOVE:
DROP USER ‘MarkEdwards’@‘321.321.321.321’ ;
CREATE USER ‘MarkEdwards’@‘123.123.123.123’ IDENTIFIED BY ‘MarksPassword’;
GRANT ALL ON `comptonPractice`.* TO ‘MarkEdwards’@‘123.123.123.123’ IDENTIFIED BY ‘MarksPassword’
WITH MAX_QUERIES_PER_HOUR 0 MAX_CONNECTIONS_PER_HOUR 0 MAX_UPDATES_PER_HOUR 0 MAX_USER_CONNECTIONS 0;
GRANT ALL PRIVILEGES ON `comptonPractice`.* TO ‘MarkEdwards’@‘123.123.123.123’;
/etc/csf/csf.allow:
tcp|in|d=3306|s=123.123.123.123
123.123.123.123 ## CenturyLink Phoenix — 2021-01-30
d= – destination
s= – source ;-)
systemctl restart csf.service ; ## important???
systemctl restart iptables ; ## important ???
iptables —flush ; ## VERY IMPORTANT!!!!!!
— Mark Edwards
,